Build a React App with Codex and the FormKiQ MCP Server
What You Will Build
In this tutorial, you will use Codex with the FormKiQ MCP server to build a React document application that uses the FormKiQ API.
The finished application should let a user:
- List documents from a FormKiQ site
- Upload a document using the FormKiQ presigned upload flow
- Search documents
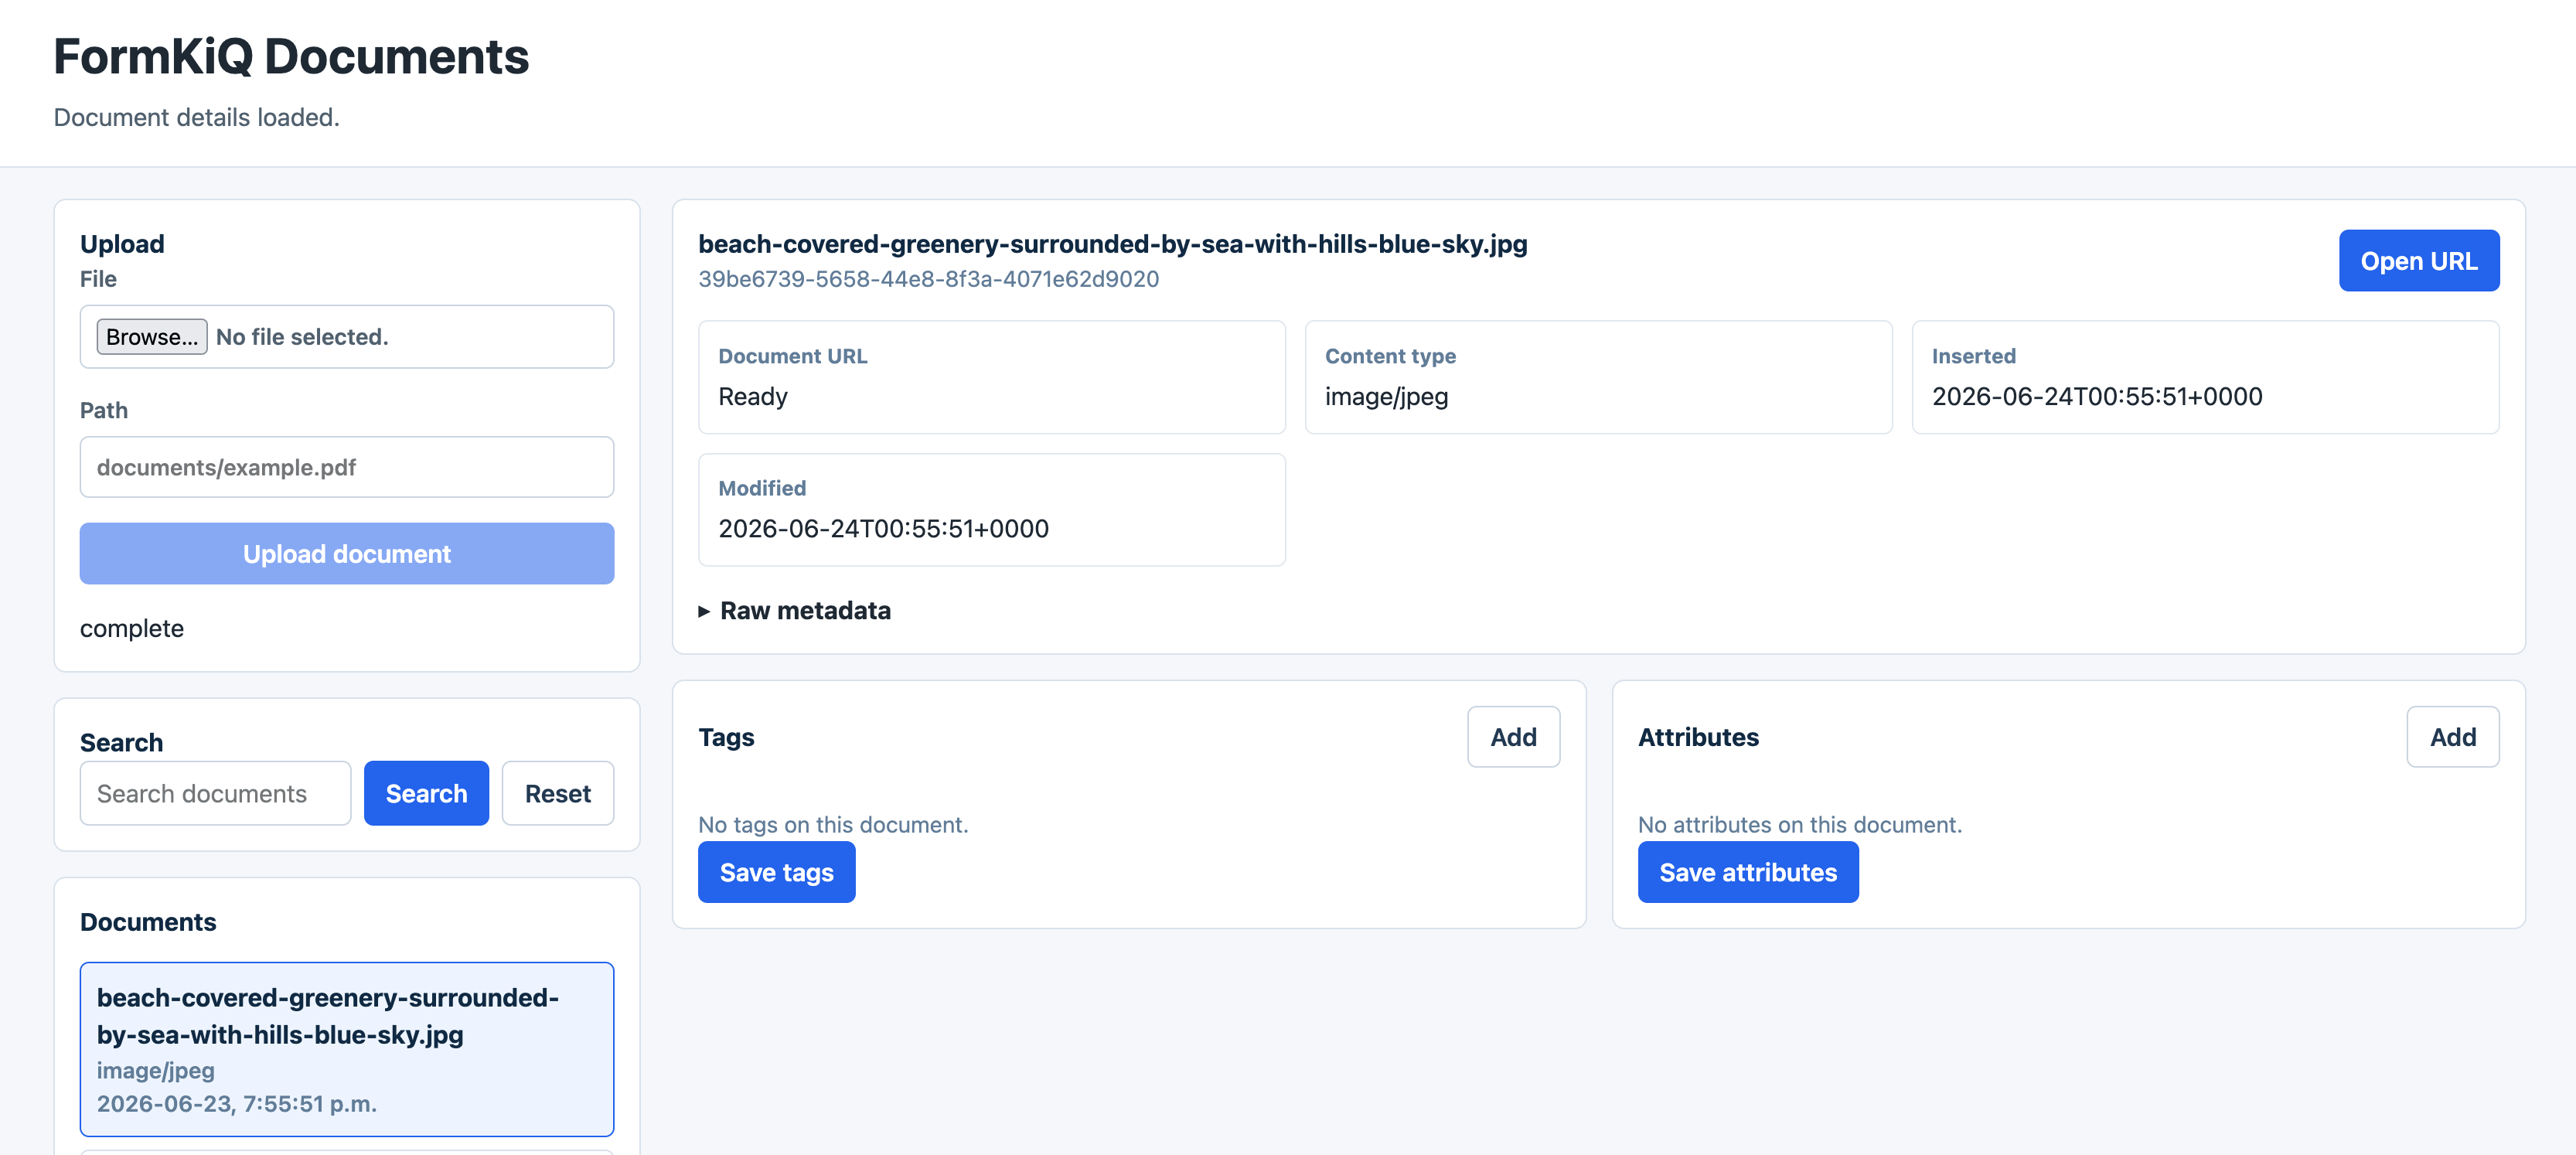
- View document metadata
- View and update document tags and attributes
- Open a document download URL
The tutorial is structured around Codex prompts and review checkpoints. Codex uses the FormKiQ MCP server to inspect supported FormKiQ API operations while building the React application.
Before You Begin
Confirm you have:
- A deployed FormKiQ environment. See Quick Start.
- The FormKiQ
HttpApiUrlCloudFormation output for JWT/Cognito authentication. - A valid JWT access token, not an ID token. See JWT Authentication Token.
- Node.js 18 or later.
- npm or yarn.
- Codex installed and configured.
pipxinstalled so Codex can start the FormKiQ MCP server from GitHub.
This tutorial uses a JWT in local development so the focus stays on the FormKiQ API workflow. Do not hardcode JWTs in a production React application. For production, use an authenticated application flow such as Cognito Hosted UI, a backend token exchange, or a server-side proxy.
Variables Used
| Placeholder | Description |
|---|---|
FORMKIQ_API_ENDPOINT_URL | FormKiQ API endpoint from the HttpApiUrl CloudFormation output. |
FORMKIQ_JWT | JWT access token used for FormKiQ API calls. |
SITE_ID | FormKiQ site ID. Use default unless your deployment uses multiple sites. |
Workflow Overview
- Configure the FormKiQ MCP server in Codex.
- Verify Codex can see the FormKiQ MCP tools.
- Ask Codex to create a Vite React TypeScript application and produce an implementation plan.
- Build a small FormKiQ API client in the React app.
- Build document list, upload, search, detail, tags, and attributes views.
- Test the app against FormKiQ.
- Review production hardening items.
Step 1: Configure Codex with the FormKiQ MCP Server
Add the MCP server to ~/.codex/config.toml or to a trusted project's .codex/config.toml:
[mcp_servers.formkiq]
command = "pipx"
args = ["run", "--spec", "git+https://github.com/formkiq/formkiq-mcp-server.git", "formkiq-mcp-server"]
env = { "MCP_TRANSPORT" = "stdio", "FORMKIQ_API_ENDPOINT_URL" = "https://abc123.execute-api.us-east-1.amazonaws.com", "FORMKIQ_JWT" = "eyJ..." }
startup_timeout_sec = 30
tool_timeout_sec = 60
enabled = true
Replace the endpoint and JWT values with your FormKiQ deployment values.
Start a new Codex session and run:
/mcp
Verify that the formkiq MCP server is enabled.
Step 2: Verify the MCP Tools
Ask Codex:
Use the formkiq MCP server to list the supported FormKiQ operations. Summarize which operations are useful for a React document management UI.
Expected operations for this tutorial include:
GetDocumentsAddDocumentUploadGetDocumentGetDocumentUrlDocumentSearchGetDocumentTagsAddDocumentTagsSetDocumentTagsGetDocumentAttributesAddDocumentAttributesSetDocumentAttributes
Step 3: Ask Codex to Create the React Application and Plan
Create an empty project folder and start Codex from that folder:
mkdir formkiq-react-documents
cd formkiq-react-documents
codex
Then prompt Codex:
Use the formkiq MCP server to inspect the FormKiQ operations needed for a React document app.

Create a Vite React TypeScript application in this folder and build an implementation plan for:
- listing documents
- uploading a document with POST /documents/upload and the returned S3 URL
- searching documents
- viewing document metadata
- viewing and editing tags
- viewing and editing attributes
- opening the document URL

Use these environment variables in a local .env.local file:
- VITE_FORMKIQ_API_ENDPOINT_URL
- VITE_FORMKIQ_JWT
- VITE_FORMKIQ_SITE_ID

Before editing files, show the file structure, package choices, and implementation steps.
Review Codex's plan before allowing it to edit files.
The VITE_ variables are bundled into the browser application. Use this only for local tutorial work with a short-lived token.
Step 4: Build the FormKiQ API Client
Ask Codex to create a small API client:
Create src/lib/formkiqClient.ts.

Use VITE_FORMKIQ_API_ENDPOINT_URL, VITE_FORMKIQ_JWT, and VITE_FORMKIQ_SITE_ID.
Implement functions for:
- listDocuments
- requestDocumentUpload
- uploadFileToPresignedUrl
- getDocument
- getDocumentUrl
- searchDocuments
- getDocumentTags
- setDocumentTags
- getDocumentAttributes
- setDocumentAttributes

Use fetch, include Authorization: Bearer <token> for FormKiQ API calls, and preserve any headers returned by the presigned upload response when uploading to S3.
Review the generated client for:
- Correct
Authorizationheader format - Correct
siteIdquery parameter handling - Correct presigned S3 upload behavior
- Clear error handling for non-2xx responses
Step 5: Build the React UI Structure
Ask Codex:
Create a practical document management UI using React and TypeScript.

Use these components:
- AppShell
- DocumentList
- DocumentUpload
- DocumentSearch
- DocumentDetail
- DocumentTagsEditor
- DocumentAttributesEditor

Keep styling simple and responsive. Put shared types in src/lib/types.ts.
Expected source structure:
src/
  components/
    AppShell.tsx
    DocumentAttributesEditor.tsx
    DocumentDetail.tsx
    DocumentList.tsx
    DocumentSearch.tsx
    DocumentTagsEditor.tsx
    DocumentUpload.tsx
  lib/
    formkiqClient.ts
    types.ts
  App.tsx
  main.tsx
Step 6: Implement Document Upload
The upload flow should:
- Let the user select a file.
- Call
POST /documents/uploadthrough the API client. - Upload bytes to the returned presigned S3 URL.
- Refresh the document list.
Prompt Codex:
Wire DocumentUpload to request a FormKiQ upload URL, upload the selected file to S3, and refresh the document list after completion.

Show upload progress states:
- idle
- requesting upload URL
- uploading file
- complete
- error
Step 7: Implement Search and Detail Views
The search flow should use DocumentSearch and display matching documents.
Prompt Codex:
Wire DocumentSearch to call the FormKiQ document search operation.
When a document is selected, load document metadata, tags, attributes, and document URL.
Show a button that opens the document URL in a new tab.
Step 8: Implement Tags and Attributes Editing
Prompt Codex:
Add editors for document tags and attributes.

For tags:
- load current tags
- allow adding, editing, and removing key/value rows
- save using the supported FormKiQ tags operation

For attributes:
- load current attributes
- allow adding, editing, and removing values
- save using the supported FormKiQ attributes operation
Review the generated request bodies against the FormKiQ OpenAPI schema before testing.
Step 9: Test the Application
Run the app:
npm run dev
Test these workflows:
- Document list loads
- A file uploads successfully
- Uploaded document appears in the list
- Search returns expected documents
- Document metadata loads
- Document URL opens
- Tags can be saved
- Attributes can be saved
Ask Codex to help debug failed calls:
The FormKiQ call failed with this response: <paste response>.
Use the formkiq MCP server and the current source code to identify whether the request path, query parameters, headers, or body are wrong.
Step 10: Production Hardening
Before using this pattern beyond a local tutorial:
- Replace local JWT variables with real application authentication.
- Do not expose long-lived access tokens in browser code.
- Consider a backend proxy for sensitive workflows.
- Add route-level authorization.
- Add upload size limits and content-type validation.
- Add retry and timeout behavior.
- Add user-friendly API error messages.
- Add tests for the FormKiQ client functions.
Tutorial Completion Criteria
The tutorial is complete when the reader has:
- A React TypeScript app generated with Codex assistance
- Codex configured with the FormKiQ MCP server
- A working document list
- A working presigned upload flow
- Search, detail, tags, and attributes workflows
- A clear understanding of what must change for production authentication