Quick Start (AWS)
Deploying FormKiQ into your AWS account with CloudFormation.
Deploy and configure FormKiQ in your AWS account in approximately 15 minutes using AWS CloudFormation. The automated setup process provisions and connects all required resources through a streamlined installation workflow.
Before You Start
Use this checklist before opening the CloudFormation installation link:
| Requirement | Why it matters |
|---|---|
| AWS account with administrator access | The stack creates IAM roles, Lambda functions, API Gateway resources, S3 buckets, DynamoDB tables, and other managed AWS resources. |
| Target AWS region selected | CloudFormation templates and service quotas are region-specific. |
| Admin email inbox access | The admin user receives an email verification link after installation. |
| Lambda concurrent executions checked | Low Lambda concurrency can cause installation or runtime issues. |
| ECS service-linked role created or confirmed | Required when the deployment uses ECS/Fargate-backed components such as Typesense. |
| 15-30 minutes available | The CloudFormation stack can take time to create all resources. |
Expected result after installation:
- CloudFormation stack status is
CREATE_COMPLETE - The FormKiQ Console URL is available from CloudFormation outputs
- FormKiQ API URLs are available from CloudFormation outputs
- The admin user can set a password and log in
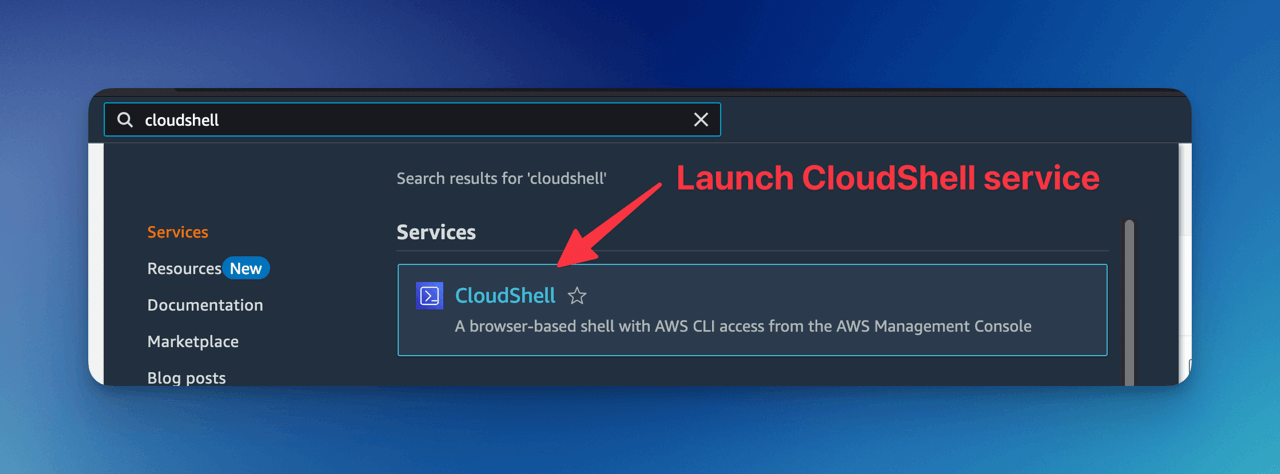
Install FormKiQ
FormKiQ Core is installed into your AWS account using AWS CloudFormation. Complete the prerequisites below, then choose the installation link for your AWS region.
Prerequisites
For this quick start you need access to an AWS account with administrator access to ensure proper permissions for creating required AWS services.
If you do not have an AWS account, you can sign up for one at https://aws.amazon.com.
AWS Lambda Concurrent Executions
Concurrent executions refer to the number of function invocations being handled simultaneously. AWS Lambda defaults to 10 concurrent executions per region. Request an increase to 1000 before installation.
Check Concurrent Executions
Run aws cli command:
aws service-quotas get-service-quota --service-code lambda \
--quota-code L-B99A9384 --region <AWS_REGION>
Resulting Value shows the AWS Lambda Concurrent executions.
{
    "Quota": {
        "ServiceCode": "lambda",
        "ServiceName": "AWS Lambda",
        "QuotaCode": "L-B99A9384",
        "QuotaName": "Concurrent executions",
        "Value": 1000.0,
        "Unit": "None",
        ...
    }
}
Request this increase for each region where you'll deploy FormKiQ.
Request Concurrent Executions Increase
Request through the Service Quotas Dashboard:
| AWS Region | Location | Request Increase Link |
|---|---|---|
| us-east-1 | N. Virginia | Request Increase |
| us-east-2 | Ohio | Request Increase |
| us-west-2 | Oregon | Request Increase |
| ca-central-1 | Canada (Central) | Request Increase |
| ca-west-1 | Canada (West) | Request Increase |
| eu-central-1 | Frankfurt | Request Increase |
| eu-west-1 | Ireland | Request Increase |
| eu-west-2 | London | Request Increase |
| eu-west-3 | Paris | Request Increase |
| eu-north-1 | Stockholm | Request Increase |
| eu-south-1 | Milan | Request Increase |
| ap-south-1 | Mumbai | Request Increase |
| ap-southeast-1 | Singapore | Request Increase |
| ap-southeast-2 | Sydney | Request Increase |
| ap-northeast-1 | Tokyo | Request Increase |
| ap-northeast-2 | Seoul | Request Increase |
| af-south-1 | Cape Town | Request Increase |
| sa-east-1 | São Paulo | Request Increase |
| me-central-1 | Middle East (UAE) | Request Increase |
| me-south-1 | Bahrain | Request Increase |
For more information, see the AWS Tutorial on Requesting a Quota Increase.
AWS Service Role for ECS
Verify that AWSServiceRoleForECS is enabled on your AWS account before installation if your deployment uses ECS/Fargate-backed components such as Typesense.
Run aws cli command:
aws iam create-service-linked-role --aws-service-name ecs.amazonaws.com
An error message such as "Service role name AWSServiceRoleForECS has been taken in this account" indicates this step is already complete.
CloudFormation Links
For installation support, feedback, or updates, please join our FormKiQ Slack Community
Ensure you've completed the prerequisites and, when needed, enabled AWSServiceRoleForECS.
The FormKiQ installation uses AWS CloudFormation to automate resource creation and management.
Select your AWS region from the installation links below:
| AWS Region | Location | Install Link |
|---|---|---|
| us-east-1 | N. Virginia | Install FormKiQ |
| us-east-2 | Ohio | Install FormKiQ |
| us-west-2 | Oregon | Install FormKiQ |
| ca-central-1 | Canada (Central) | Install FormKiQ |
| ca-west-1 | Canada (West) | Install FormKiQ |
| eu-central-1 | Frankfurt | Install FormKiQ |
| eu-west-1 | Ireland | Install FormKiQ |
| eu-west-2 | London | Install FormKiQ |
| eu-west-3 | Paris | Install FormKiQ |
| eu-north-1 | Stockholm | Install FormKiQ |
| eu-south-1 | Milan | Install FormKiQ |
| ap-south-1 | Mumbai | Install FormKiQ |
| ap-southeast-1 | Singapore | Install FormKiQ |
| ap-southeast-2 | Sydney | Install FormKiQ |
| ap-northeast-1 | Tokyo | Install FormKiQ |
| ap-northeast-2 | Seoul | Install FormKiQ |
| af-south-1 | Cape Town | Install FormKiQ |
| sa-east-1 | São Paulo | Install FormKiQ |
| me-central-1 | Middle East (UAE) | Install FormKiQ |
| me-south-1 | Bahrain | Install FormKiQ |
- For unlisted regions, use SAM CLI installation
- FormKiQ Core supports AWS GovCloud (US) West but not East
- AWS China installations are not currently supported
- FormKiQ Essentials, Advanced, and Enterprise users: use your custom CloudFormation template links provided by the FormKiQ team
Create the FormKiQ Stack
After selecting your region, you'll see the AWS CloudFormation Console with the FormKiQ installation URL pre-populated.
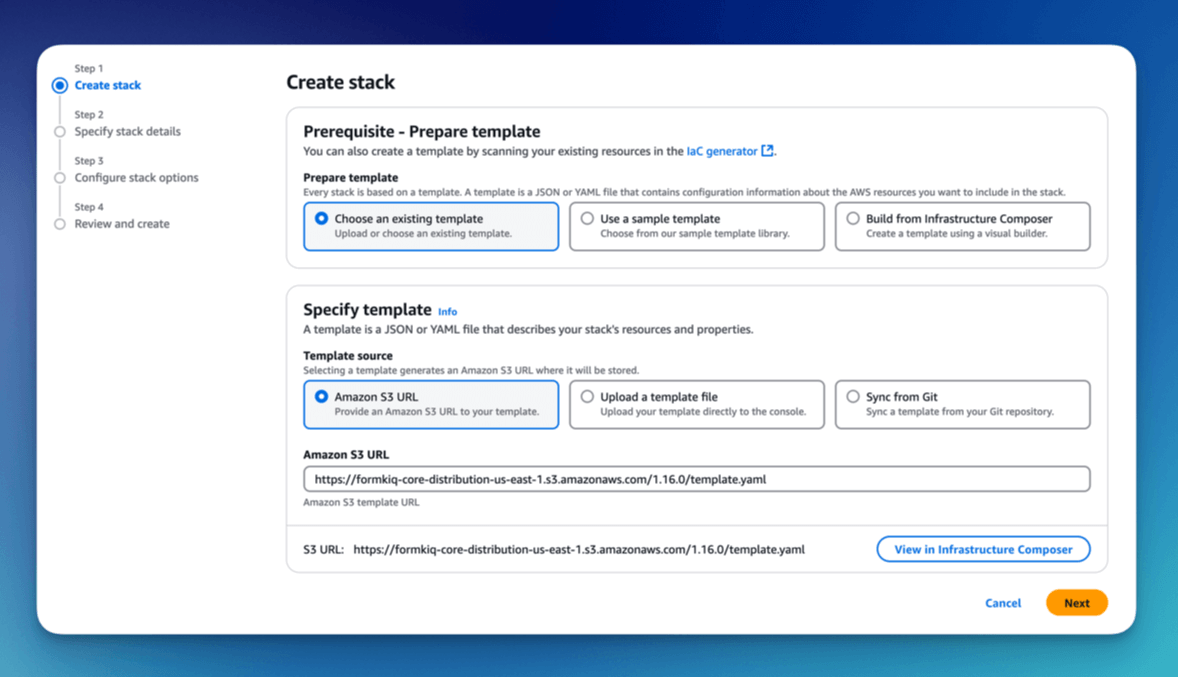
Click Next to continue.
Set Stack Name
Name your stack using the format formkiq-core-<app_environment> (e.g., formkiq-prod).
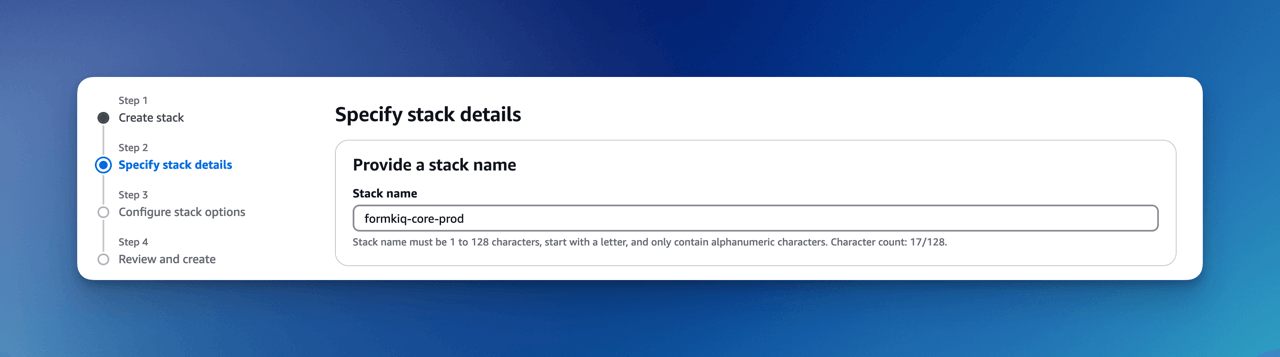
For production, we recommend using AWS Organizations and separate accounts for different environments.
Installation Parameters
Configure your installation:
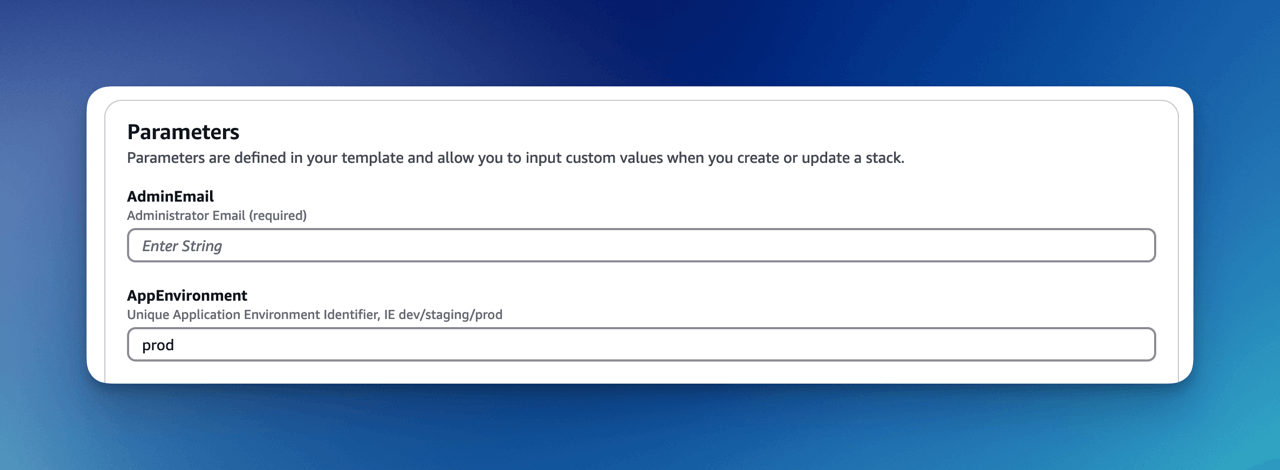
Required Parameters
- AdminEmail: Administrator email address
- AppEnvironment: Environment identifier (prod, staging, dev, etc.)
Optional Parameters
- CapacityProvider: AWS Fargate capacity provider (for Typesense)
- EnablePublicUrls: Enable public endpoints (default: false)
- PasswordMinimumLength: Minimum password length
- Password Requirements: Several properties to configure requirements for length, lowercase, numbers, symbols, and uppercase
- TypesenseApiKey: API key for Typesense
- TypesenseMemory: Typesense memory allocation
- VpcStackName: VPC stack name (used for Typesense or OpenSearch)
Configure Stack Options
On the stack options page, keep the default values unless your AWS organization requires different tags, permissions, or stack policy settings.
At the bottom of the page, select all required CloudFormation acknowledgement checkboxes. These acknowledge that the template can create IAM resources and nested resources needed by FormKiQ.
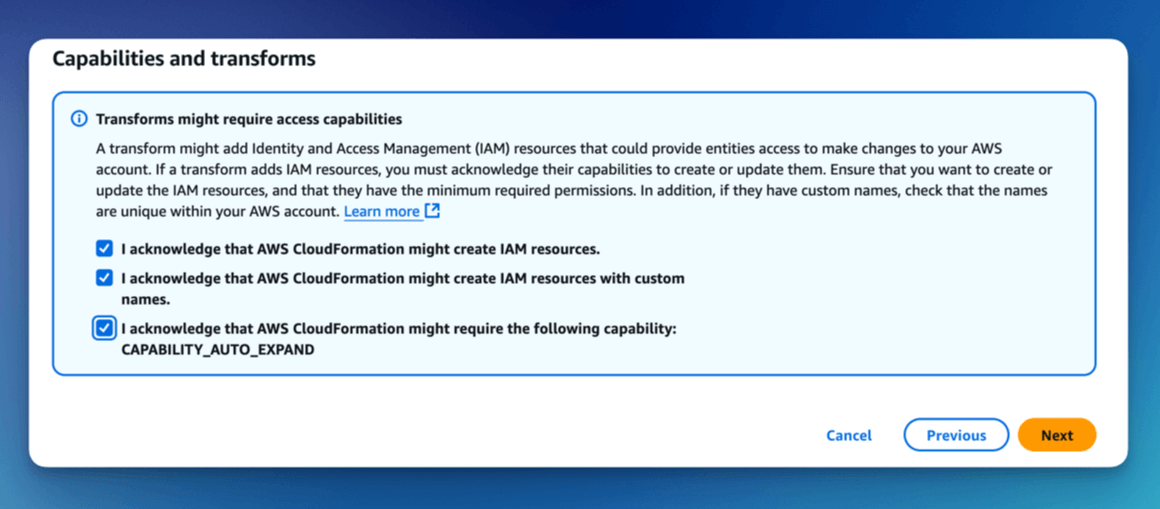
Click Next to proceed.
Review and Create
Review your configuration and click Submit.
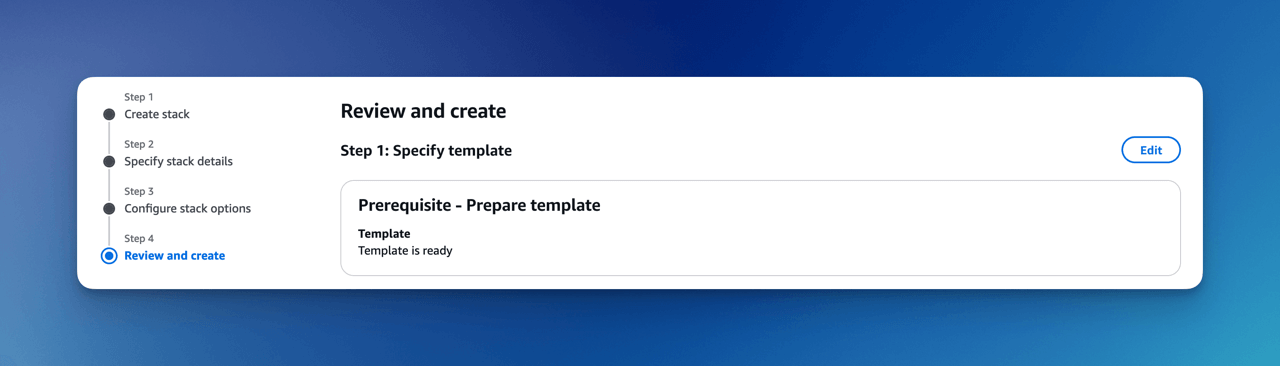
- Installation takes 15-30 minutes
- You'll receive an admin email when complete
Configure Admin Password
- Check your admin email for the verification link
- Click "Verify Email" to set your password
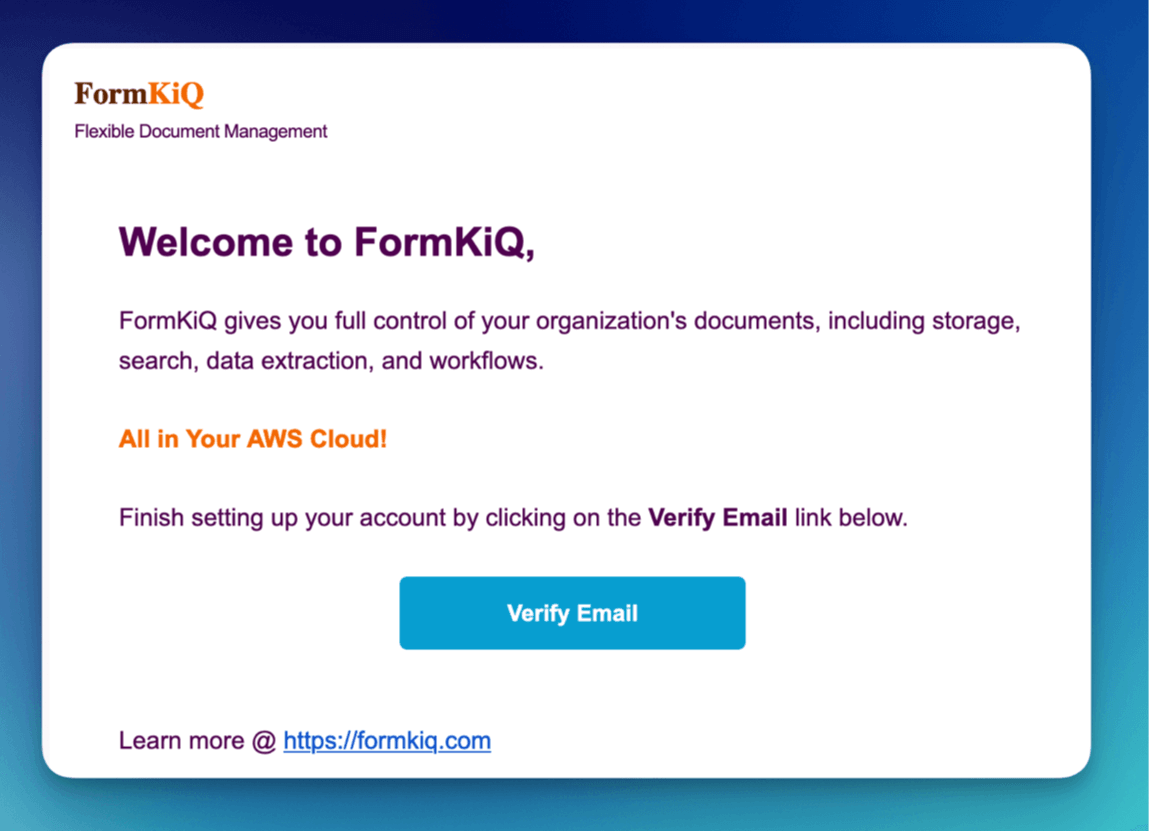
- Set your admin password

- Access the FormKiQ Console
AWS GovCloud (US) requires manual admin user creation.
Verify Installation
After the CloudFormation stack completes, verify the installation before moving on to API testing or additional configuration.
Check Stack Status
- Open the AWS CloudFormation console in the region where you installed FormKiQ.
- Select the FormKiQ stack.
- Confirm the stack status is
CREATE_COMPLETE.
If the stack fails or remains incomplete, use the troubleshooting steps below before retrying.
CloudFormation Troubleshooting
If your stack does not reach CREATE_COMPLETE, open the CloudFormation Events tab and look for the first failed resource. Nested stacks can have their own events, so check child stacks if the top-level error is not specific.
For a step-by-step event inspection workflow, follow the CloudFormation Troubleshooting guide.
Review Stack Outputs
Open the Outputs tab for the FormKiQ stack and find the values you need for initial access.
Common outputs include:
| Output | Use |
|---|---|
| Console URL | Opens the FormKiQ web console. |
| HTTP API URL | Used for JWT-authenticated API calls. |
| IAM API URL | Used for IAM-authenticated API calls. |
| Key API URL | Used for API-key-authenticated API calls, when enabled. |
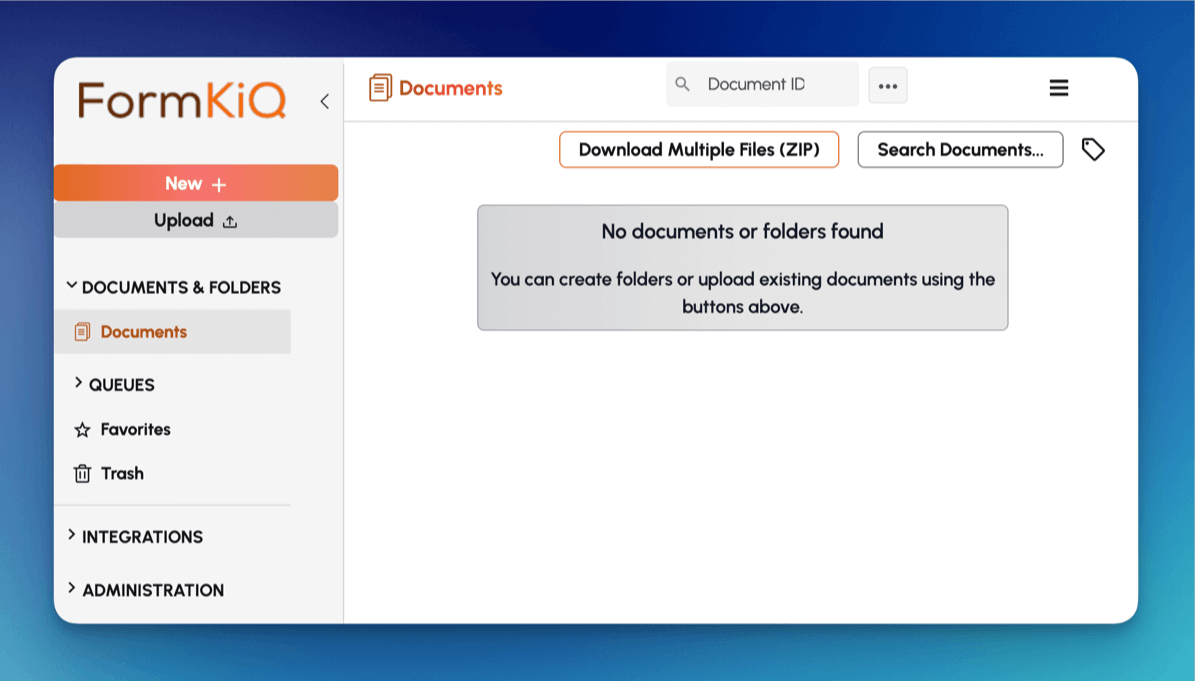
Confirm Admin Access
- Open the FormKiQ Console URL.
- Use the admin email verification flow to set the initial password.
- Log in to the FormKiQ Console.
- Confirm that you can view the default site and document interface.
Common Problems
Admin Email Did Not Arrive
Check the spam or quarantine folder for the admin email address. Also confirm that the AdminEmail stack parameter was entered correctly.
If the stack completed but no email arrived, review the Cognito user pool and user status in the AWS console.
Stack Failed or Is Stuck
Open the CloudFormation stack events and look for the first failed resource. Nested stacks can have their own events, so check child stacks if the top-level error is not specific.
Use the CloudFormation Troubleshooting guide for a step-by-step event inspection workflow.
Lambda Quota Is Too Low
If Lambda concurrency is too low, request a quota increase in the region where you are deploying FormKiQ and retry after the quota is approved.
ECS Service-Linked Role Error
If the stack reports an ECS service-linked role issue, run the ECS service-linked role command in the AWS Service Role for ECS section, then retry the installation.
VPC CIDR Conflict
If the VPC stack fails because of CIDR overlap, choose a CIDR range that does not conflict with existing VPCs in the same AWS account, connected networks, or AWS Organization environment strategy.
Console URL Does Not Open
Confirm the FormKiQ stack is complete and check the Console URL in the CloudFormation outputs. For AWS GovCloud (US), use the GovCloud console instructions.
Next Step
After the console is working, follow the API Walkthrough to make your first FormKiQ API requests.
Optional: Install VPC
For Typesense or OpenSearch, install the VPC stack:
Select your region's VPC template:
| AWS Region | Location | Install Link |
|---|---|---|
| us-east-1 | N. Virginia | Install VPC |
| us-east-2 | Ohio | Install VPC |
| us-west-2 | Oregon | Install VPC |
| ca-central-1 | Canada (Central) | Install VPC |
| ca-west-1 | Canada (West) | Install VPC |
| eu-central-1 | Frankfurt | Install VPC |
| eu-west-1 | Ireland | Install VPC |
| eu-west-2 | London | Install VPC |
| eu-west-3 | Paris | Install VPC |
| eu-north-1 | Stockholm | Install VPC |
| eu-south-1 | Milan | Install VPC |
| ap-south-1 | Mumbai | Install VPC |
| ap-southeast-1 | Singapore | Install VPC |
| ap-southeast-2 | Sydney | Install VPC |
| ap-northeast-1 | Tokyo | Install VPC |
| ap-northeast-2 | Seoul | Install VPC |
| af-south-1 | Cape Town | Install VPC |
| sa-east-1 | São Paulo | Install VPC |
| me-central-1 | Middle East (UAE) | Install VPC |
| me-south-1 | Bahrain | Install VPC |
Create CloudFormation Stack
After selecting your VPC installation link and logging in, you'll see the CloudFormation Create Stack console with the pre-populated FormKiQ VPC installation URL.
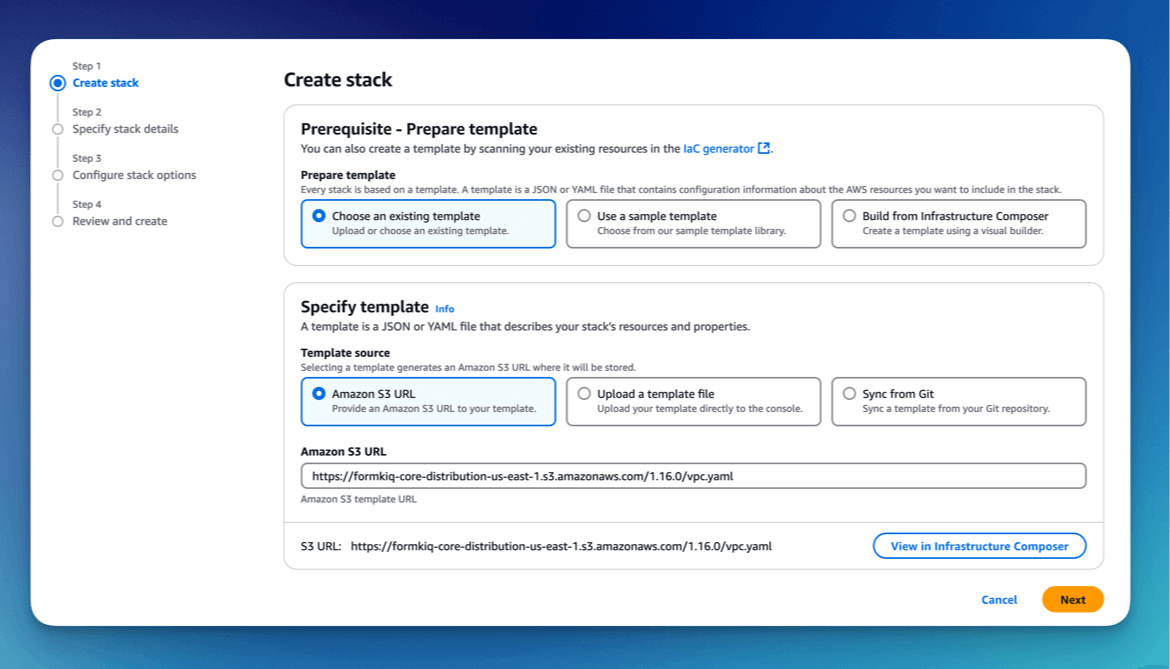
Click the Next button to move to the next page.
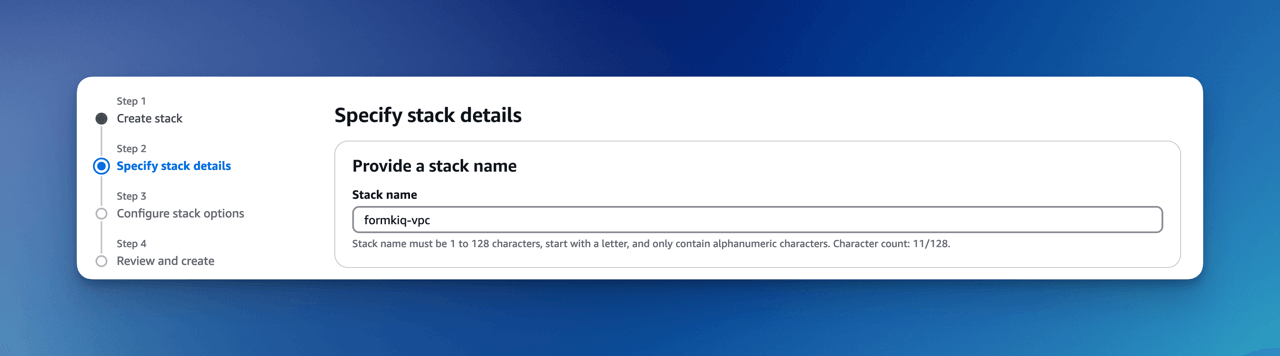
Set Stack Name
The stack name uniquely identifies your FormKiQ VPC deployment within AWS CloudFormation.
We recommended to use the naming convention formkiq-vpc.
Installation Parameters
The following is description of the VPC installation parameters:
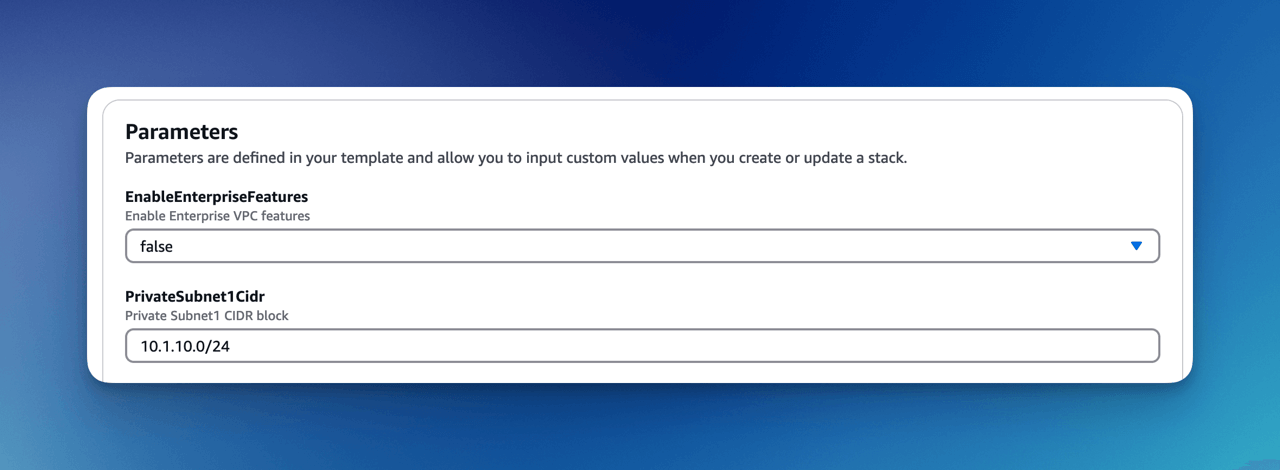
EnableEnterpriseFeatures:
If you are using OpenSearch, you need to enable enterprise features, which automatically setups VPC endpoints.
This is not required for FormKiQ Core.
CIDR Ranges:
The VPC sets up 3 public, and 3 private subnets.
When creating the VPC, you need to specify an IPv4 network range for the VPC, in CIDR notation. For example, 10.1.0.0/16.
We recommend choosing a CIDR block that you know is not being used by any existing AWS resources in your AWS Organization. Ideally, each AWS account (one for each environment) is using its own CIDR range, e.g., 10.10.0.0/16 for dev, 10.20.0.0/16 for test/qa, etc.
VpcLabel:
The label added to the created VPC. This will be visible in the AWS Management Console when viewing your VPCs, and will help identify this VPC in future.
Configure stack options
Scroll down to the bottom of the page, select ALL the checkboxes.
Click the Next button to move to the next page.
Review and create
Scroll down to the bottom.
Click the Submit button to start the VPC installation.
Once the installation has completed, you will need to attach this Stack to your FormKiQ installation, by updating the VpcStackName parameter.
Attach the VPC Stack to FormKiQ
This step is essential in order to enable access to Typesense or OpenSearch
After creating the VPC stack, update the main FormKiQ CloudFormation stack so its VpcStackName parameter points to the VPC stack.
This section is only for connecting the optional VPC stack to a FormKiQ installation. For version updates, upgrades, and rollback planning, see Updates, Upgrades, and Rollbacks.
Select the FormKiQ CloudFormation stack and then click the Update button.
When updating the stack you will want to choose Use existing template.
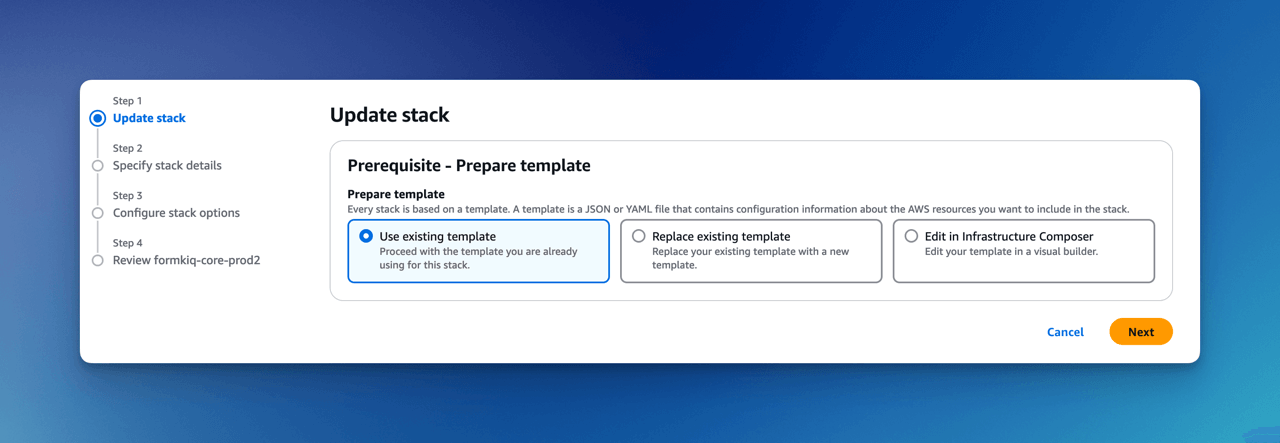
For the VpcStackName parameter, set the value to the same value you used for the VPC stack you created above; in our example, it was formkiq-vpc.

Click the Next button to move to the next pages. On the last page click the Submit button to update the FormKiQ stack. After the Stack completes updating, the FormKiQ installation will have the VPC features enabled.
Optional: Install with SAM CLI
FormKiQ Core was built using the AWS Serverless Application Model (SAM) framework.
The Serverless Application Model Command Line Interface (SAM CLI) is an extension of the AWS CLI that adds functionality for deploying serverless applications.
Prerequisite
To use SAM CLI, you will need to install the following tools:
- AWS CLI - Install the AWS CLI (https://aws.amazon.com/cli/)
- SAM CLI - Install the SAM CLI (https://docs.aws.amazon.com/serverless-application-model/latest/developerguide/serverless-sam-cli-install.html)
Get Latest Release
The latest version of FormKiQ Core can be found on the https://github.com/formkiq/formkiq-core/releases page on Github.
Download the file with the naming convention of: formkiq-core-X.X.X.zip
Once downloaded, unzip the file in its own directory.
INSTALL.md
LICENSE
template.yaml
...
SAM Deploy
To deploy FormKiQ Core, run the following command in the same folder as the template.yaml file.
sam deploy --guided --capabilities CAPABILITY_IAM CAPABILITY_AUTO_EXPAND CAPABILITY_NAMED_IAM
The command will package and deploy your application to AWS, with a series of prompts:
| Argument | Description | Default Value |
|---|---|---|
| Stack Name | The name of the stack to deploy to CloudFormation. This should be unique to your account and region | formkiq-core-<AppEnvironment> |
| AdminEmail | Set the admin email address. During the FormKiQ installation, this email address will be automatically set up with administrator access. | |
| AppEnvironment | AppEnvironment is a unique identifier for FormKiQ installations. The identifier should provide context for the type of environment, e.g., prod, staging, or dev. | prod |
| EnablePublicUrls | Whether to enable "/public" endpoints. | false |
| PasswordMinimumLength | Minimum Password Length | 8 |
| PasswordRequireLowercase | Whether Password requires a lowercase letter | false |
| PasswordRequireNumbers | Whether Password requires a number | false |
| PasswordRequireSymbols | Whether Password requires a symbol | false |
| PasswordRequireUppercase | Whether Password requires a uppercase letter | false |
| VpcStackName | Optional: The name of the FormKiQ VPC CloudFormation stack | null |
| TypesenseApiKey | Optional: API Key to access the Typesense server | null |
| CapacityProvider | Optional: CapacityProvider used by AWS Fargate service | FARGATE_SPOT |
- Confirm changes before deploy: If set to yes, any change sets will be shown to you before execution for manual review. If set to no, the AWS SAM CLI will automatically deploy application changes.
- Allow SAM CLI IAM role creation: FormKiQ Core's AWS SAM templates create AWS IAM roles required for the AWS Lambda function(s) included to access AWS services. The permissions are passed in by the
sam deploycommand above. Set Value to 'Y' - Save arguments to samconfig.toml: If set to yes, your choices will be saved to a configuration file inside the project, so that in the future you can just re-run
sam deploywithout parameters to deploy changes to your application.
Once you have set all of these options, SAM CLI will create a changeset and display a list of all actions that will be performed as part of the changeset. If you have set "confirm changes before deploy" to "y", you will be asked whether to deploy this changeset. Choose "y" to complete the installation.
Once the FormKiQ Core stack has been deployed, you will be able to find your API Gateway Endpoint URL in the output values displayed after deployment.
FormKiQ Console for AWS GovCloud (US)
Due to restrictions related to AWS GovCloud (US) and the lack of CloudFront availability, the FormKiQ Document Console is not installed as part of the deployment. Instead, you can deploy a docker image into GovCloud for internal or external access. More information can be found here.
API Walkthrough and Reference
After installation, the best way to confirm API access is to make a small document request against your new FormKiQ environment.
Use the API Walkthrough when you want a guided Postman workflow for:
- configuring your FormKiQ API base URL
- choosing an authentication method
- adding a test document
- retrieving document metadata
- updating document content or tags
- searching for documents
Find Your API URL
Open the CloudFormation Outputs tab for your FormKiQ stack. The API URL you use depends on the authentication method:
| Output | Use when |
|---|---|
HttpApiUrl | You want to use JWT authentication from a signed-in FormKiQ user. |
IamApiUrl | You want to call FormKiQ using AWS IAM credentials and AWS request signing. |
KeyApiUrl | You want to use an API key, when API key authentication is enabled. |
Choose an Authentication Method
Most first-time API tests should start with JWT authentication because it uses the admin user created during installation. IAM authentication is usually better for backend AWS integrations. API key authentication is useful for controlled service access or development scenarios where it has been explicitly enabled.
For setup details, see API Security Tokens or follow the authentication steps in the API Walkthrough.
Use the API Reference
After the walkthrough, use the FormKiQ API Reference to explore the full set of endpoints. The reference is most useful once you already know your base URL and authentication method.
Common next endpoints to review:
- Documents: create, retrieve, update, delete, and search documents
- Document uploads: upload larger files through generated upload URLs
- Sites: manage site-level document partitions
- Attributes and schemas: define structured metadata
- Rulesets and workflows: automate document processing
For SDK-based integrations, see SDKs & API Integration.